Table of contents
- What is Nginx?
- Installation of Nginx
- Nginx Configuration Overview
- Nginx as a Web Server
- Reverse Proxy in Nginx
- Securing Nginx with SSL/TLS
- Nginx as a Load Balancer
- Optimizing Nginx for Performance
- Nginx Modules and Extensions
- Rate Limiting and Throttling
- Security Best Practices for Nginx
- Troubleshooting Nginx Issues
- Monitoring and Logging in Nginx
- Nginx in Production Environments
- Conclusion and Further Learning
- FAQs
What is Nginx?
Nginx (pronounced as "Engine-X") is an open-source, high-performance HTTP server and reverse proxy, as well as an IMAP/POP3 proxy server. It was created by Igor Sysoev in 2004 with the goal of addressing the C10K problem, which refers to a server's inability to handle more than 10,000 simultaneous client connections. Since its inception, Nginx has grown in popularity due to its lightweight architecture, scalability, and efficiency in handling concurrent connections.
In addition to serving static content (HTML, CSS, JS), Nginx is widely used as a reverse proxy, load balancer, and HTTP caching server in many modern applications.

History and Evolution of Nginx
The development of Nginx began in the early 2000s when Igor Sysoev aimed to solve the issues faced by Apache, the dominant web server of the time. Nginx was first released in October 2004 and has since evolved from being a simple web server into a robust, multipurpose tool for web hosting, proxying, and load balancing. As of today, Nginx powers over 30% of the web, used by many major companies such as Netflix, WordPress, and GitHub.
Nginx vs. Apache: A Comparative Overview
While both Apache and Nginx are popular web servers, they have different approaches to handling web requests:
Connection Handling:
Nginx uses an event-driven, asynchronous architecture that handles requests in a non-blocking manner. This allows it to manage a large number of concurrent connections efficiently.
Apache, in its default configuration, is process-driven and assigns each connection to a specific process or thread, which can result in higher memory usage for many connections.
Performance:
Nginx is often faster at serving static files and can handle more concurrent requests with lower memory consumption.
Apache is more flexible with dynamic content, thanks to its extensive module ecosystem but may require tuning for high-performance needs.
Ease of Configuration:
Apache configuration relies on
.htaccessfiles, making it easier to change settings per directory.Nginx uses a central configuration file, which can be more challenging for beginners but results in faster processing as Nginx doesn’t need to check configuration files in multiple directories.
Nginx Use Cases in Modern Web Applications
Nginx’s versatility allows it to serve multiple roles in web infrastructure:
Static File Server:
Nginx is often employed to serve static files such as HTML, CSS, JavaScript, and images with speed and efficiency.Reverse Proxy Server:
Acting as a gateway between clients and servers, Nginx can distribute requests to multiple backend services and enhance security by hiding the origin server.Load Balancer:
Nginx balances traffic across multiple servers, optimizing resource usage and enhancing application availability.Caching Server:
It caches content for faster retrieval and reduces the load on backend servers.
Installation of Nginx
Installing Nginx on Linux (Ubuntu/CentOS)
To install Nginx on Ubuntu:
sudo apt update
sudo apt install nginx
For CentOS:
sudo yum install epel-release
sudo yum install nginx
After installation, you can start the Nginx service:
sudo systemctl start nginx
sudo systemctl enable nginx
Installing Nginx on Windows
While Nginx is primarily used in Linux environments, it can also run on Windows. To install Nginx on Windows:
Download the latest stable release from nginx.org.
Extract the ZIP file.
Navigate to the Nginx folder in the command prompt and run
nginx.exe.
Verifying and Starting Nginx
After installation, you can check if Nginx is running by opening a web browser and navigating to http://localhost. If you see the Nginx welcome page, it’s running correctly.
Alternatively, use:
sudo systemctl status nginx
Basic Configuration of Nginx Post-Installation
After installing Nginx, its configuration files are located at /etc/nginx/ (for Linux). The main configuration file is nginx.conf, where you define server blocks, proxy settings, and more.
You can make changes to the configuration and reload Nginx to apply them:
sudo systemctl reload nginx
Nginx Configuration Overview
Understanding the Structure of Nginx Configuration Files
The main configuration file, nginx.conf, is structured into several contexts:
Main context: Global directives, such as the number of worker processes, are defined here.
Events context: Controls connection processing (e.g., worker connections).
HTTP context: Contains server configurations like server blocks, location directives, etc.
Nginx Configuration File Syntax and Directives
Nginx’s configuration syntax is simple, with directives defined inside contexts using the following format:
directive_name value;
For example:
worker_processes 4;
Common directives include:
- worker_processes: Controls the number
of worker processes.
listen: Defines the port on which Nginx listens.
server_name: Specifies the domain Nginx responds to.
Configuring Server Blocks (Virtual Hosts)
Server blocks are the equivalent of virtual hosts in Apache. You can define multiple server blocks in Nginx to serve different websites:
server {
    listen 80;
    server_name example.com;
    root /var/www/html/example.com;

    location / {
        try_files $uri $uri/ =404;
    }
}
Managing Multiple Sites with Nginx
Nginx allows you to host multiple sites by creating separate server block files in /etc/nginx/sites-available/ and linking them to /etc/nginx/sites-enabled/. Each site has its own server block.
Nginx as a Web Server
Serving Static Content with Nginx
Nginx excels at serving static content directly from the file system. The root directive in a server block specifies the directory where the files are stored:
server {
    listen 80;
    server_name mysite.com;
    root /var/www/mysite;
}
Handling Dynamic Content with FastCGI and PHP-FPM
While Nginx does not natively execute dynamic content like PHP, it can interface with FastCGI processors such as PHP-FPM. Example PHP configuration:
server {
    listen 80;
    server_name example.com;
    root /var/www/html;

    location ~ \.php$ {
        include snippets/fastcgi-php.conf;
        fastcgi_pass unix:/var/run/php/php7.4-fpm.sock;
    }
}
Configuring Nginx for Python (Using uWSGI or Gunicorn)
Nginx can be used to serve Python applications by proxying requests to uWSGI or Gunicorn. For instance, to configure Nginx with Gunicorn:
server {
    listen 80;
    server_name mypythonapp.com;

    location / {
        proxy_pass http://127.0.0.1:8000;
    }
}
Nginx Logging: Access Logs and Error Logs
Nginx logs every request in two files:
Access logs: Logs all HTTP requests.
Error logs: Logs errors encountered during processing.
You can find these logs in /var/log/nginx/access.log and /var/log/nginx/error.log. The log format can be customized in the configuration:
log_format custom '$remote_addr - $remote_user [$time_local] "$request"';
access_log /var/log/nginx/access.log custom;
Reverse Proxy in Nginx
What is a Reverse Proxy and Why Use It?
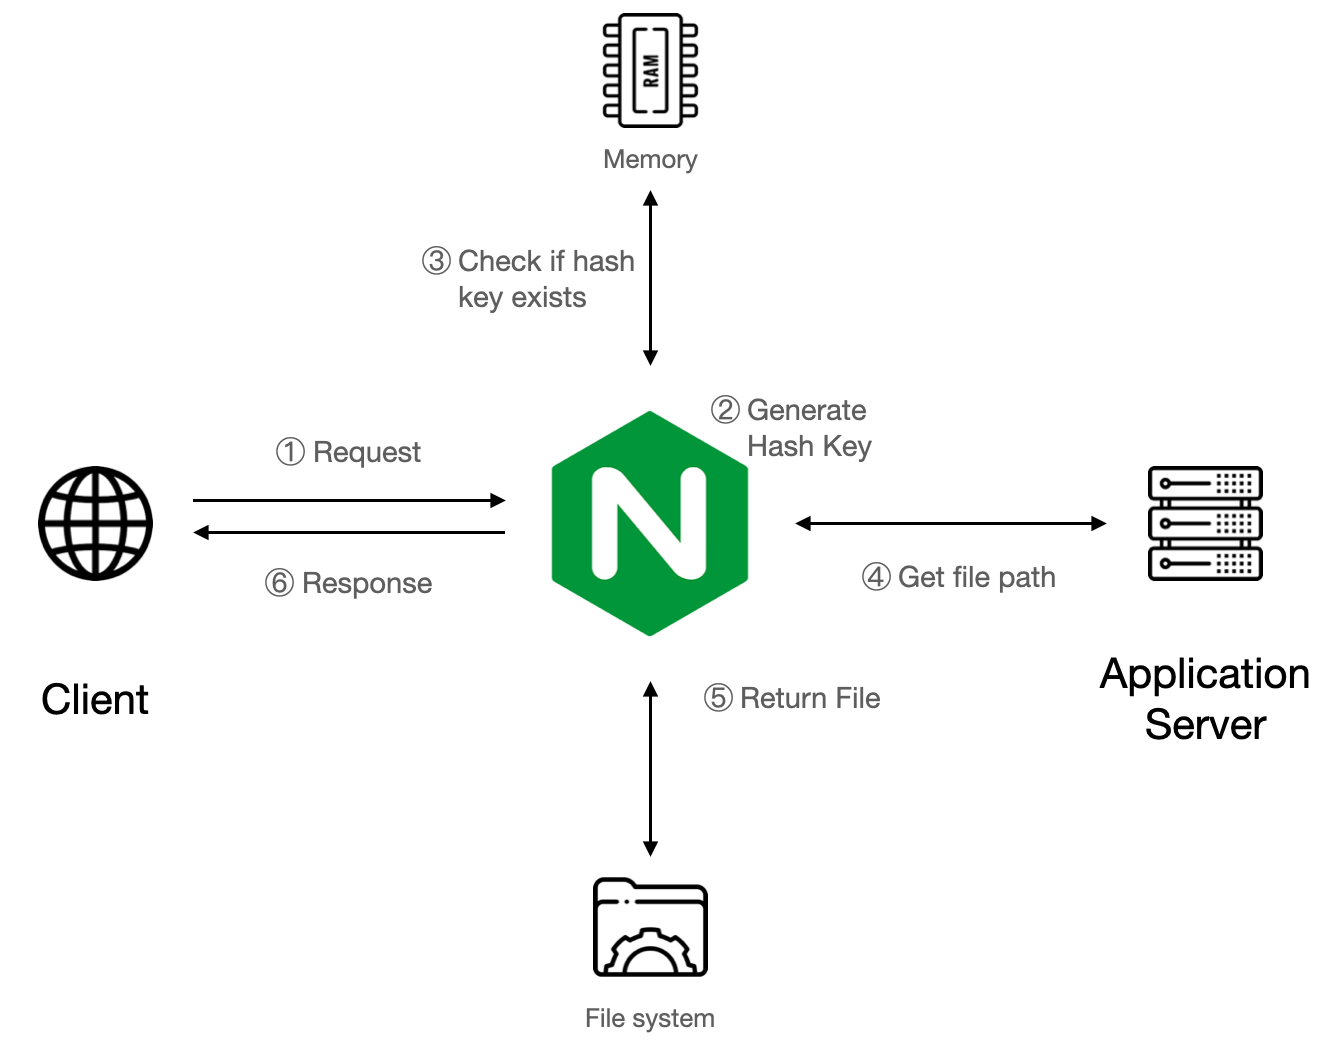
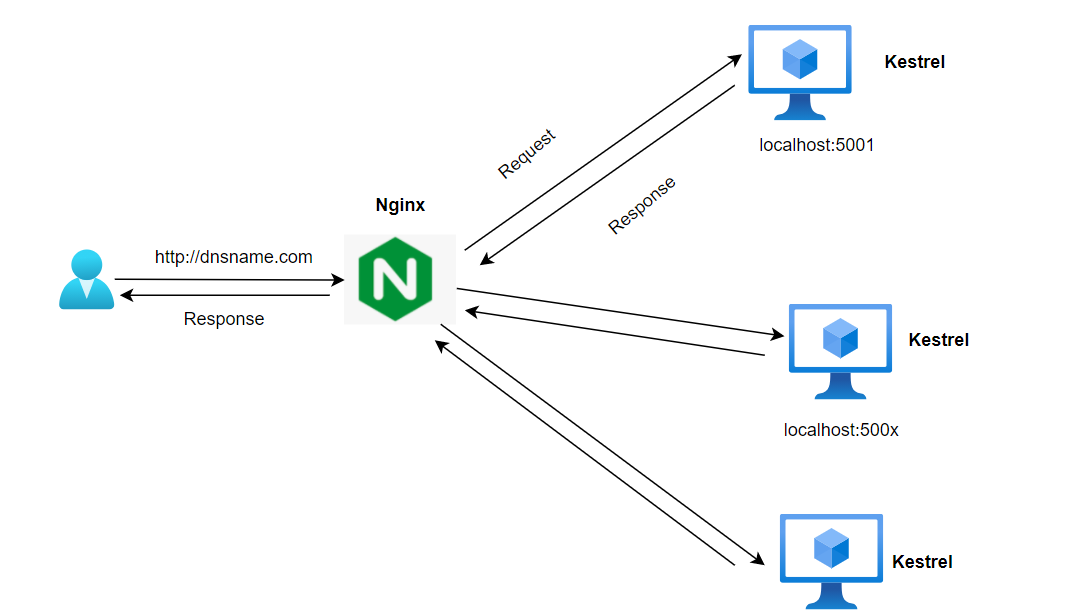
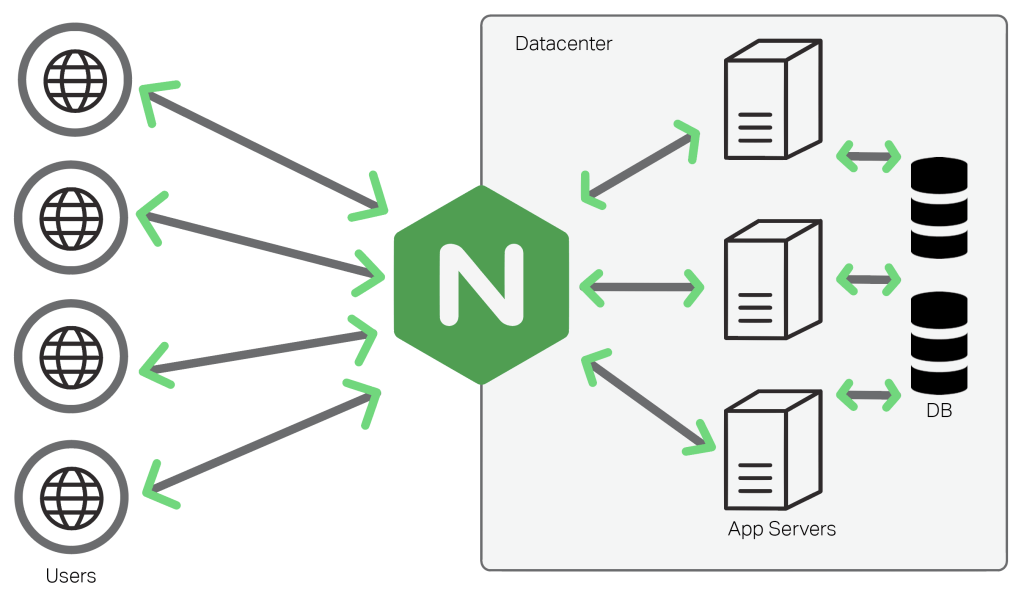
A reverse proxy acts as an intermediary server that forwards client requests to other backend servers. It enhances security by hiding the backend server details and improves performance by caching responses.

Configuring Nginx as a Reverse Proxy
To configure Nginx as a reverse proxy, use the proxy_pass directive:
server {
    listen 80;
    server_name mysite.com;

    location / {
        proxy_pass http://127.0.0.1:8080;
        proxy_set_header Host $host;
        proxy_set_header X-Real-IP $remote_addr;
    }
}
Nginx Caching for Improved Performance
Nginx can cache content to improve response times for frequently requested resources. Use the proxy_cache directive to enable caching:
proxy_cache_path /data/nginx/cache levels=1:2 keys_zone=my_cache:10m;
server {
    location / {
        proxy_cache my_cache;
        proxy_pass http://backend;
    }
}
Securing Nginx with SSL/TLS
Understanding SSL/TLS and Why It’s Necessary
SSL/TLS encrypts the communication between the client and server, providing security and ensuring data integrity. HTTPS, which relies on SSL/TLS, is now a requirement for modern web applications.
Generating SSL Certificates with Let’s Encrypt
Let’s Encrypt is a free Certificate Authority that simplifies SSL certificate generation. On Linux, you can use Certbot to obtain and install a certificate:
sudo apt install certbot python3-certbot-nginx
sudo certbot --nginx -d example.com
Configuring Nginx for HTTPS
Once you have an SSL certificate, configure Nginx for HTTPS:
server {
    listen 443 ssl;
    server_name example.com;
    ssl_certificate /etc/letsencrypt/live/example.com/fullchain.pem;
    ssl_certificate_key /etc/letsencrypt/live/example.com/privkey.pem;
}
HTTP/2 Support in Nginx
HTTP/2 provides faster performance by allowing multiple concurrent requests over a single connection. To enable HTTP/2 in Nginx, add the http2 parameter:
server {
    listen 443 ssl http2;
    server_name example.com;
    ...
}
Nginx as a Load Balancer
Load Balancing with Nginx

Nginx can distribute traffic across multiple backend servers. You can define a group of upstream servers and use load balancing methods like round robin:
upstream backend {
    server backend1.example.com;
    server backend2.example.com;
}

server {
    location / {
        proxy_pass http://backend;
    }
}
Types of Load Balancing (Round Robin, IP-Hash, Least Connections)
Nginx supports several load balancing methods:
Round robin: Distributes requests sequentially across servers.
IP hash: Distributes requests based on client IP.
Least connections: Sends requests to the server with the fewest connections.
Configuring Nginx for Load Balancing
Here’s an example of round-robin load balancing:
upstream backend {
    server backend1.example.com;
    server backend2.example.com;
}

server {
    location / {
        proxy_pass http://backend;
    }
}
Health Checks for Upstream Servers
Nginx can be configured to periodically check the health of backend servers and remove unresponsive servers from the pool. This is typically done through third-party modules like ngx_http_healthcheck_module.
Optimizing Nginx for Performance
Gzip Compression in Nginx
Gzip reduces the size of the response body, speeding up the delivery of resources. To enable gzip compression:
gzip on;
gzip_types text/css application/javascript;
Optimizing Nginx Buffers and Timeouts
Adjusting buffer sizes and timeouts can optimize Nginx performance:
client_body_buffer_size 16k;
client_max_body_size 2M;
keepalive_timeout 65;
Enabling HTTP/2 for Improved Speed
HTTP/2 allows browsers to multiplex requests, which reduces latency. You can enable HTTP/2 by adding the http2 parameter to your SSL configuration.
Caching Static Content for Better Performance
Nginx can cache static content using the expires directive:
location ~* \.(jpg|jpeg|png|gif|css|js)$ {
    expires 30d;
    access_log off;
}
Nginx Modules and Extensions
What Are Nginx Modules?
Nginx modules extend its functionality. There are two types:
Core modules: Included with Nginx.
Third-party modules: Added during installation.
Installing Third-Party Modules for Nginx
Third-party modules require recompiling Nginx from source. For example, to install the nginx-rtmp module:
sudo apt-get install libpcre3 libpcre3-dev zlib1g zlib1g-dev
./configure --add-module=/path/to/nginx-rtmp-module
make && make install
Useful Nginx Modules
ModSecurity: Enhances security by filtering and monitoring HTTP traffic.
PageSpeed: Improves performance by optimizing resources automatically.
RTMP Module: Enables streaming media services.
Rate Limiting and Throttling
Configuring Rate Limiting in Nginx
Rate limiting helps prevent abuse by controlling the number of requests a client can make. You can set rate limits in Nginx with the limit_req_zone directive:
limit_req_zone $binary_remote_addr zone=one:10m rate=5r/s;

server {
    location / {
        limit_req zone=one burst=10;
    }
}
Throttling Connections for Performance and Security
Nginx can also limit the number of concurrent connections:
limit_conn_zone $binary_remote_addr zone=addr:10m;

server {
    location / {
        limit_conn addr 20;
    }
}
Security Best Practices for Nginx
Hardening Nginx for Security
Several steps can be taken to enhance Nginx security:
Disable unnecessary modules.
Hide Nginx version numbers.
Use strong SSL configurations with recommended ciphers.
Protecting Against DDoS Attacks
Rate limiting, as mentioned above, can help protect against DDoS attacks. Additionally, using a Web Application Firewall (WAF) such as ModSecurity can provide further protection.
Blocking Malicious IP Addresses Nginx allows you to block specific IP addresses:
server {
    deny 192.168.1.1;
}
Using Nginx with a Firewall
To enhance security, Nginx should be used in combination with a firewall, such as UFW (Uncomplicated Firewall) or iptables, to block unnecessary ports and restrict access to the server.
Troubleshooting Nginx Issues
Common Nginx Errors and How to Fix Them
502 Bad Gateway:
- This usually indicates an issue with the backend server. Check if the backend service is running.
404 Not Found:
- Ensure the root directory is correctly defined in the Nginx configuration.
Debugging Nginx Logs
Nginx logs provide valuable information for troubleshooting. You can increase the verbosity of the logs by setting the error_log directive to debug mode:
error_log /var/log/nginx/error.log debug;
How to Reload and Restart Nginx Without Downtime
Nginx can be reloaded without dropping connections using the following command:
sudo systemctl reload nginx
This allows Nginx to apply new configurations without downtime.
Monitoring and Logging in Nginx
Enabling and Configuring Nginx Logs
Logs are crucial for understanding traffic patterns and troubleshooting issues. Nginx’s logging can be customized with the log_format directive to provide more detail:
log_format custom '$remote_addr - $remote_user [$time_local] "$request"';
Real-Time Monitoring Tools (e.g., Grafana, Prometheus)
Nginx can be integrated with tools like Grafana and Prometheus to provide real-time metrics and visualizations. Prometheus can scrape Nginx metrics, and Grafana can display them in customizable dashboards.
Nginx in Production Environments
Best Practices for Deploying Nginx in Production
Use HTTPS for all sites.
Implement rate limiting and connection throttling.
Monitor logs regularly.
Regularly update Nginx to patch security vulnerabilities.
High Availability (HA) with Nginx
To ensure high availability, Nginx can be deployed in an active-passive or active-active setup with load balancers and failover mechanisms like Keepalived.
Configuring Nginx for Containerized Environments (Docker/Kubernetes)
Nginx is often used as a reverse proxy in containerized environments. For Docker, Nginx can be configured in a Dockerfile and run in a container. In Kubernetes, Nginx is commonly used as an ingress controller.
Conclusion and Further Learning
Key Takeaways and Best Practices for Using Nginx
Nginx is a powerful, versatile tool that serves multiple roles in web infrastructure, from a simple web server to a complex reverse proxy and load balancer. Best practices for using Nginx include enabling HTTPS, optimizing performance with caching and compression, and securing your configuration with rate limiting and firewalls.
Resources for Further Learning and Expertise in Nginx
FAQs
1. What is Nginx and what are its primary uses?
Nginx is a high-performance web server and reverse proxy server known for handling a large number of concurrent connections. It’s used to serve static content, act as a reverse proxy, load balance, and cache resources.
2. How do I install Nginx on Ubuntu?
You can install Nginx on Ubuntu using the following commands:
sudo apt update
sudo apt install nginx
3. How does Nginx compare to Apache?
Nginx uses an event-driven, asynchronous architecture that is more efficient at handling a high number of concurrent connections, while Apache uses a process-driven approach that can consume more memory under heavy loads.
4. What is a reverse proxy in Nginx?
A reverse proxy in Nginx forwards client requests to backend servers. This provides security benefits and can improve load distribution across multiple servers.
5. How do I enable HTTPS with Nginx?
To enable HTTPS, you need to generate or obtain an SSL certificate and configure Nginx with the appropriate SSL settings. You can use Let’s Encrypt to get a free SSL certificate.
6. How can I improve Nginx performance?
You can improve performance by enabling caching, Gzip compression, and HTTP/2, as well as optimizing buffer sizes and timeouts...
If you find this article helpful, please consider sponsoring me for more in-depth articles and contributions. Your support helps me create even better content! 🙌